How to run a gridnode
Table of contents
Sending tokens
The first step is to send tokens to your address. For a gridnode to operate, ensure that one input in your address holds precisely 2,000 tokens (note: older gridnodes with 3,000 tokens will still function).
To begin, copy your main address (the one tokens were minted to as currently you are only allowed to send tokens to that same address). Click on the clipboard icon adjacent to the address you intend to send tokens to.

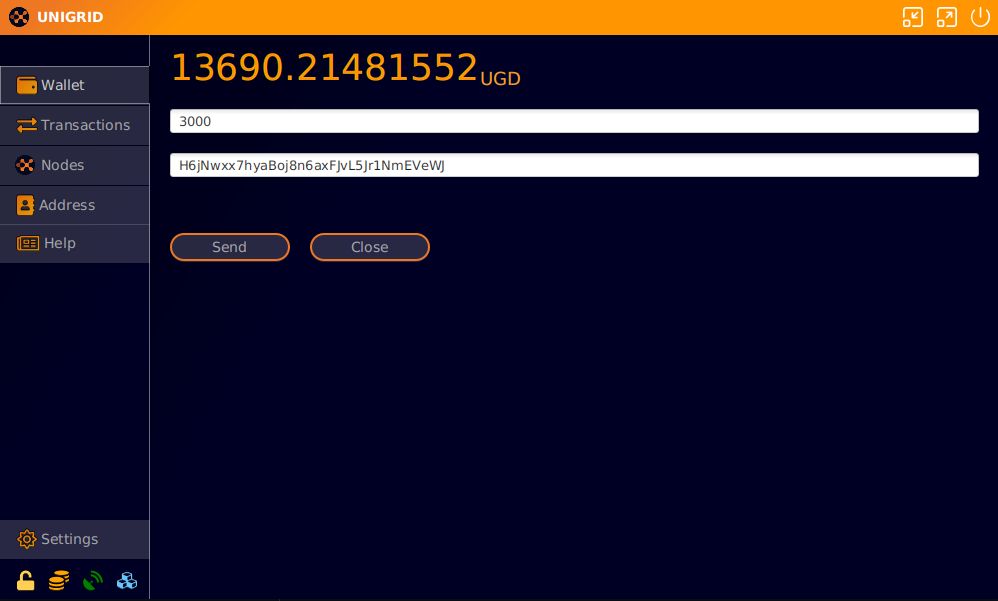
Next, send exactly 2,000 tokens to this address. From the main Wallet screen, select Send. Input the address you’ve just copied and specify 2,000 tokens. Click Send and provide your passphrase if your wallet is encrypted.
Get transaction hash
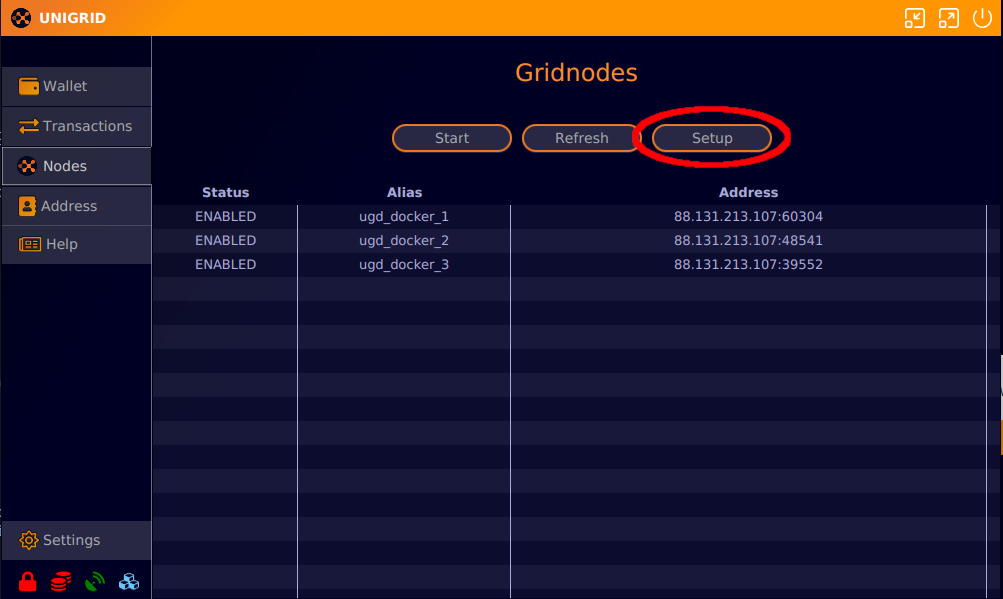
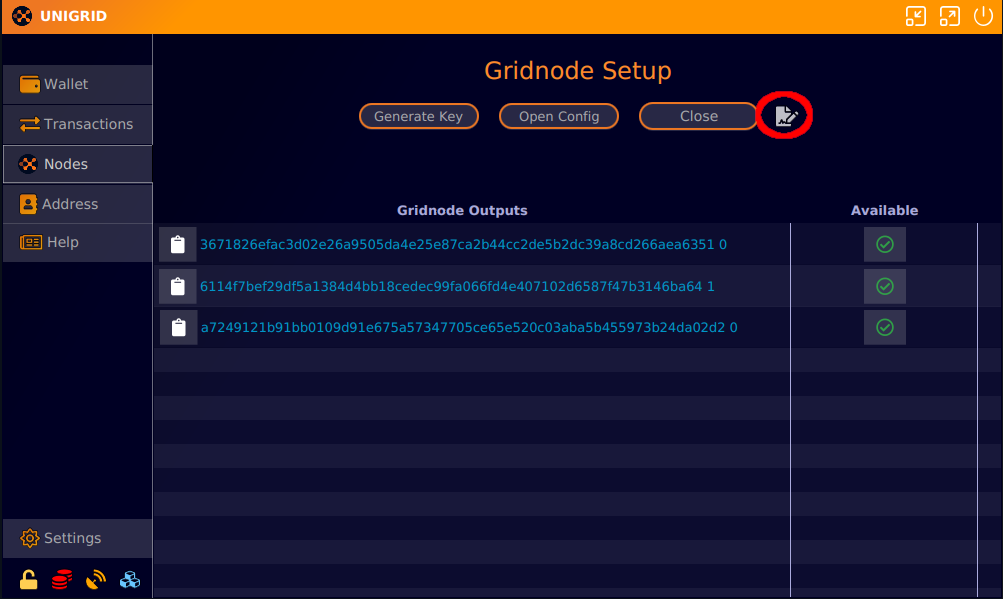
Once the transaction processes, it will display on your Wallet screen. Allow a few minutes for the transaction to register on the network. Navigate to the Nodes screen and press the Setup button.
On the Setup screen, if your transaction has been confirmed by the network, you’ll see it. A green check indicates the transaction hasn’t been used for another node, while a red ban icon signifies it’s already in use.
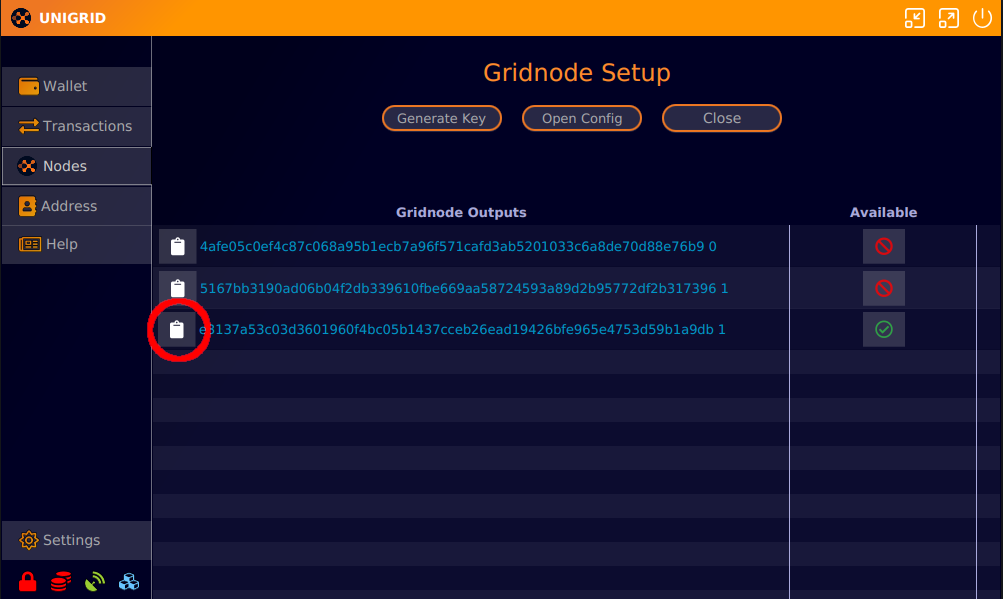
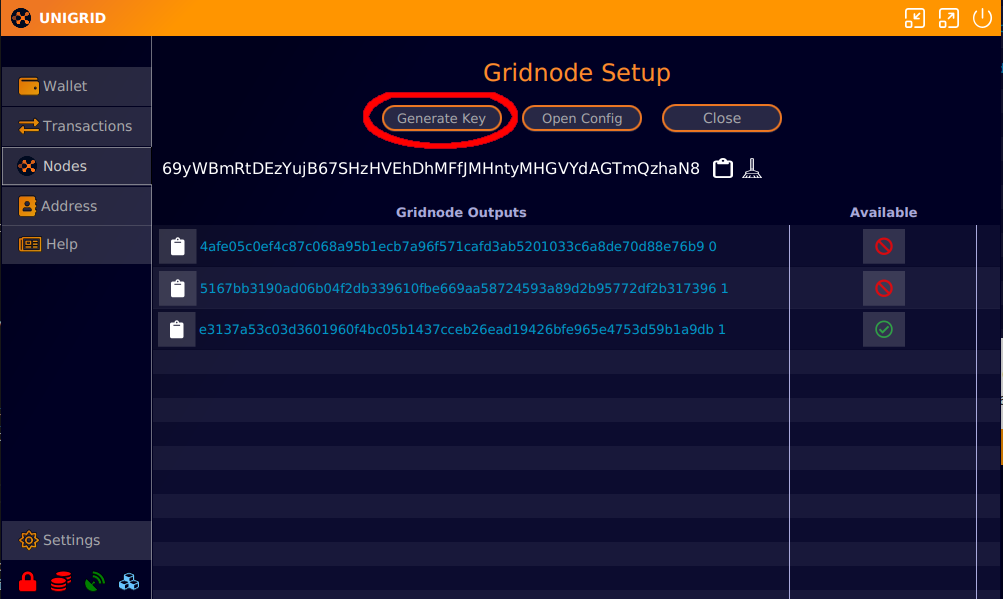
On this screen, you’ll also need to generate a key for the gridnode. Click the Generate Key button. This action copies the key to your clipboard for easy access. Alternatively, click on the clipboard icon when needed.
Making Sure Your Gridnodes Work Right
Common Mistake: Sending Tokens Again and Again
A mistake many people make is sending the same amount of tokens over and over. This messes things up because the tokens shift to different spots (outputs). When that happens, the old spot becomes useless, causing your gridnode to stop working.
How to Avoid This Mistake: Locking the Spot
To prevent this issue, follow these steps every time you send tokens:
- Send the tokens to your address.
- Find the spot (output) where the tokens went. You either wait for it appear in the list or use the explorer like this transaction as an example tx where the amount that is capable of running a gridnode is spot
0 - Save this in your
gridnode.conffile temporarily. - Restart Janus to lock the spot.
- Now, the spot is locked, and you can send tokens again safely following these steps.
This way, you lock each spot before sending more tokens, keeping your gridnodes working smoothly.
Example for gridnode.conf File
Here’s how to save the spot in the gridnode.conf file:
If ab1a2e3d60ea00085766ad1428a761aadc656749662816e77b650da071763bf2 0 is your token transaction and spot, remember:
- You can reuse the
gridnodeprivkeyvalue many times; for example,93HaYBVUCYjEMeeH1Y4sBGLALQZE1Yc1K64xiqgX37tGBDQL8Xg. - The name, IP, and port can be anything for now. We’re just locking the spot before getting the right details from the setup script on the server.
For one node, you might use gridnode_1 127.0.0.2:51992. For another node, you could use gridnode_2 127.0.0.2:51992.
# Format: name IP:port gridnodeprivkey token_transaction spot
gridnode_1 127.0.0.2:51992 93HaYBVUCYjEMeeH1Y4sBGLALQZE1Yc1K64xiqgX37tGBDQL8Xg ab1a2e3d60ea00085766ad1428a761aadc656749662816e77b650da071763bf2 0
If you have multiple spots, it would look like this:
# Format: name IP:port gridnodeprivkey token_transaction spot
gridnode_1 127.0.0.2:51992 93HaYBVUCYjEMeeH1Y4sBGLALQZE1Yc1K64xiqgX37tGBDQL8Xg ab1a2e3d60ea00085766ad1428a761aadc656749662816e77b650da071763bf2 0
gridnode_2 127.0.0.2:51992 93HaYBVUCYjEMeeH1Y4sBGLALQZE1Yc1K64xiqgX37tGBDQL8Xg ab1a2e3d60ea00085766ad1428a761aadc656749662816e77b650da071763bf2 1
# ... and so on for other transactions with their spots
After restarting Janus, the spot ab1a2e3d60ea00085766ad1428a761aadc656749662816e77b650da071763bf2 at 0 will be locked and can’t be used until you remove it from the gridnode.conf file.
Server setup
To follow this guide, you’ll need a server running Ubuntu 18+, a Debian-based distro, or access to a VPS (Virtual Private Server). Several VPS servers are available for rent. We recommend a few that we’ve used for years:
We suggest a minimum of 4.5GB (these amounts can and will fluctuate) per gridnode you plan to run (resource requirements may change in future updates). In the future, gridnodes will benefit from dedicated servers, maximizing server resources and earning corresponding rewards.
Connect to server
Connect to server
Windows
For Windows, use powershell or the Windows 11 terminal. We also recommend the bitvise SSH client, available for download here. Bitvise includes a file explorer, useful for transferring files to the server.
For connection, use the command below in powershell or terminal. Replace root with your VPS’s assigned user and 127.0.0.1 with the server’s IP address. After connecting, you’ll be prompted for a password:
ssh root@127.0.0.1
For Bitvise users, follow this guide to connect to your VPS.
OSX and Linux
On OSX and Linux, use the terminal to connect to the server. The example below demonstrates the connection process. Replace root with your VPS’s assigned user and 127.0.0.1 with the server’s IP address. After connecting, you’ll be prompted for a password:
ssh root@127.0.0.1
gridnode script
We’ve developed an automated script for gridnode installation and setup. This script fetches the latest wallet for your server and uses the previously copied transaction ID to initiate a gridnode. Click the icon below to copy the script:
Alternatively, copy (ctrl+v or cmd+v) the code below and paste it into your terminal. In the bitvise SSH client, right-click to paste:
bash -ic "$(wget -4qO- -o- raw.githubusercontent.com/unigrid-project/unigrid-installer/main/node_installer.sh)" ; source ~/.bashrc
After installation, the script will prompt for a txid and output index, which corresponds to the earlier copied transaction ID. Enter this ID and press ENTER.
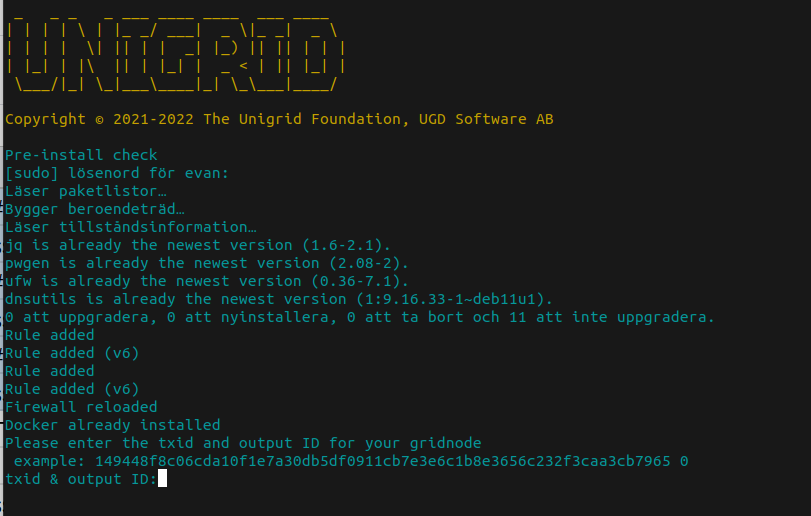
Following this, the script will request the key generated earlier. Input this key and press ENTER. The script will then retrieve the latest docker image for Unigrid.

After setup and a full sync of the blockchain (5-10 minutes), you should now see something like the below with a string at the end starting with ugd_docker. This is the string we will need to copy back in our conf file to enable the gridnode.
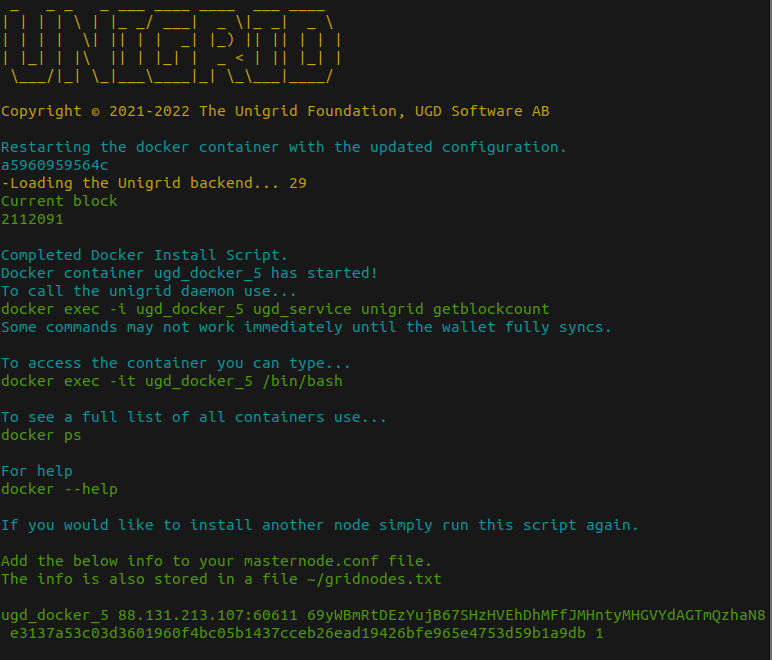 image.png The outputs from the script are also placed in a txt file on your server. To open that type
 nano ~/gridnodes.txt. If nano is not installed you can also try vim ~/gridnodes.txt.
Configuration file
Return to the Unigrid Janus wallet, navigate to the nodes/setup screen, and click the Open Config button. This action opens a text file where you should paste the script’s output.
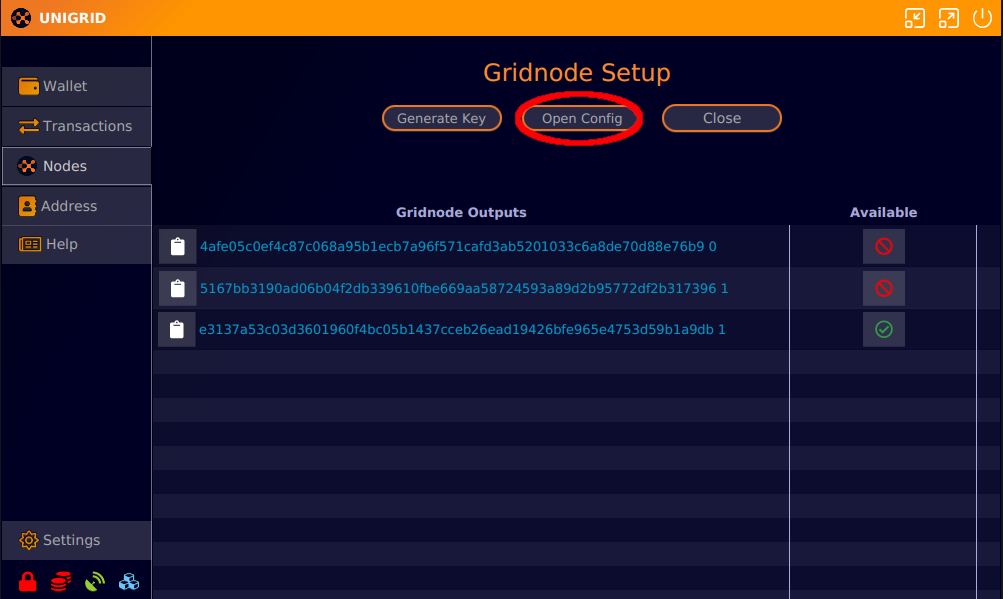
Ensure each node entry is on a separate line for the wallet to parse the file correctly. Avoid adding text other than the script’s output, as it might prevent the wallet from opening. After saving and closing this file, it’s essential to restart your wallet, especially if you’re setting up multiple gridnodes simultaneously. While this step will not be necessary in future releases, it’s currently the only method to configure multiple gridnodes.

Starting the node
After restarting your wallet, the configuration file will load, allowing you to initiate the node. Ensure your wallet is synchronized before starting any MISSING nodes.
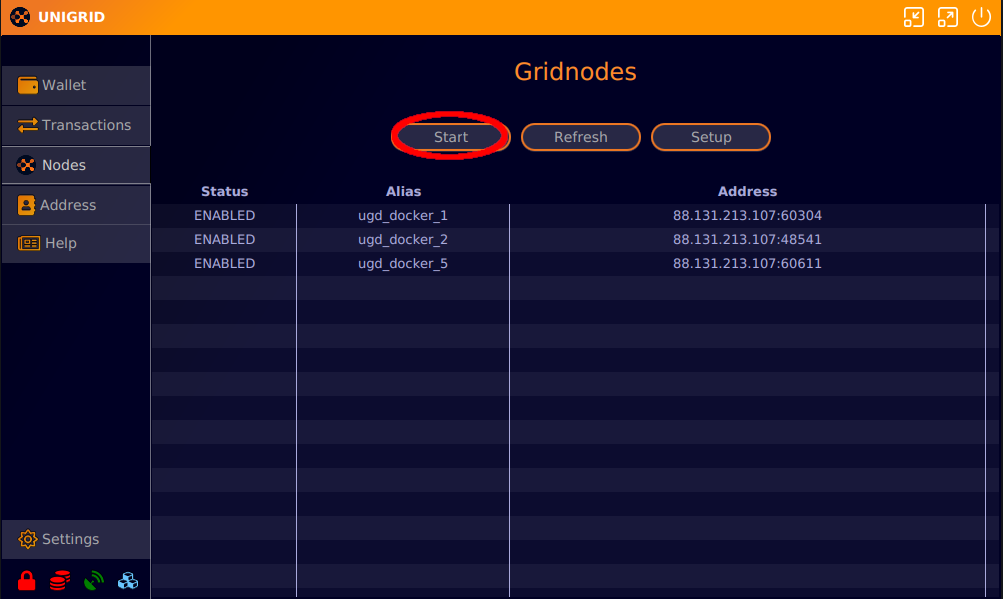
To start, navigate to the Nodes screen and press the Start button. This action will attempt to activate any disabled nodes in the list. If your wallet is encrypted, you’ll be prompted for your password. Occasionally, this step may need to be repeated several times before the network recognizes your newly generated gridnodes. This is a known bug, but it will be resolved once we transition to the Cosmos SDK chain.
Install another node
If you wish to install an additional node on the same server and have the necessary resources, follow the steps above and execute the installer script again. Happy noding!
Built in script commands
The installer includes utility commands for accessing nodes and retrieving information. Here’s a brief list:
unigrid list
Shows a list of all running containers that are installed.
unigrid status
Shows whether the containers are running and for how long.
unigrid debug
Returns information about the gridnode start start for all containers.
unigrid restart-all
Restart all containers.
unigrid start-all
Start all containers.
unigrid get-blocks
Returns the block height of each node container.
unigrid resync-node ugd_docker_1
Resyncs a single gridnode using the bootstrap file. This does not remove any of your nodes settings and only installs a freshly synced chain. Use this is you are having trouble syncing a node. If you have more than one node you can change the name of
unigrid remove-all
Removes all containers you have installed. Warning this cannot be undone. Only use for full reintalls of all contianers.
unigrid help
List of available commands for unigrid.
Single node communication
To communicate with an individual node, use its container name followed by the desired command. For instance, the first installed container will be named ugd_docker_1.
ugd_docker_1 getinfo
To restart a single container.
docker restart ugd_docker_1
To enter the container itself.
docker exec -it ugd_docker_1 /bin/bash
Get the block count of a single container.
ugd_docker_1 getblockcount